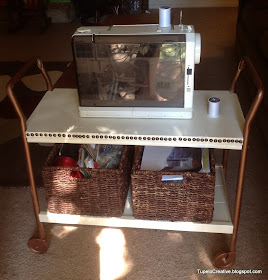
In the crafty interim of my hand injury, I got bored, and finally upgraded some furniture. I took my cart from drab, thrifted bleh to Shabby Chic pretty.
Here's the story:
A long, long time ago, I blogged about thrifting. It was my SECOND blog post EVER. If you actually got back and read it, I'm sorry! I've learned a lot over these few months. It's wild to see my older posts. Anyway, in the corner of one picture, next to a chair, sits this poor cart:
I'd make the picture bigger, but it was a terrible pic - blurry and poor lighting. I was just learning my camera then. Anyway, it's a good and sturdy cart I picked up at Goodwill for $9.99.
It was pretty basic - wood paneling on the lower part, a "new" mismatched piece of wood for the top part, aluminum rails, and clear plastic casters. The metal was beat up and discolored in places, and the plastic wheels looked terrible - they used to be clear, but over time the plastic has scuffed up and is white on the part that touches the ground.
It took me until now to get around to remaking the poor thing. It's a funny thing, being a perfectionist. I can *choose* not to make things perfect, or I can dream it perfectly, but I need to procrastinate. I have to plan it just right. It's a problem :)
Since the wood was varnished, I decided I would paint the whole cart. I also wanted to replace the casters, but this particular style expensive and hard to find. So I decided to paint those as well as the wood and metal. I needed a "cover anything" type primer, Bullseye 1-2-3. I hadn't used this spray before this project. It will work on just about anything - metal, plastic, wood, etc.
Sidenote: know your primers. If you use spray paint on furniture with the wrong primer, it may rub right off. Look into it.
Here's how I did it:
1. I dismantled the cart, and put the screws all in a safe place so I wouldn't lose them.
2. Then I primed the pieces.
- I finished off one can on the whole cart, for all the pieces, and it was close. But it covered really well, and made a nice, paintable surface. Would I use that product again? Totally. It covers well and dries quickly too.
3. I let all the primer dry and cure according to the can.
4. I followed up with the paint colors I wanted:
- For the metal pieces and casters, I followed the primer with a coat of copper covered "metallic" paint. It's not as metallic as I had hoped, but more of a fine glitter. Still looks nice though.
- For the wood, I used a cream color, satin finish spray paint. I had to use 2 cans. That was a bit of a pain - the paint I used (a Valspar product) paint has a "fragrance" added to it, maybe to be more pleasant? All I know is we needed to stay away for a couple of days after that....our house was too fume-ridden.
5. I let it all dry, cure, and air out, and reassembled the cart. Seriously, let it air out even after you reassemble it. It takes awhile for the chemical smell to level out, and you don't want that in your home.
6. I added furniture tacks to one side of the upper shelf of the cart for visual interest.
- I measured out a straight line, right down the middle, with a ruler. The tacks tended to shift to find the softest bit of wood though, and some just bent whichever way they wanted to. I'm happy with the look though - I think it looks a bit shabby chic. I used 3 packs of tacks, in case anyone needs to know. The bronze color was close to the copper I used.
Want to see the finished product?
 |
| Shabby Chic cart in it's home environment. |
 |
| Close up of the cream and copper together: PS, those scuffs? dog hair and leaf pieces. Oh autumn...they brush off at least. |
I used some wicker baskets to store craft supplies, loaded up the cart with my new Elna, and set my lamp back on the cart. I'm pretty happy with how it turned out. What do you think?
Thanks for stopping by!
PS - I linked this up at these parties:


I LOVE the way you updated the cart - and the baskets on it are so cute!! Thanks for linking up at Romance on a dime last week. Hope to see you tomorrow!
ReplyDelete