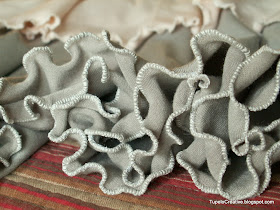
Now, I have a run of the mill, very un-fancy Singer, that gets the job done, but we tend to fight about how it gets done a bit. So here's how I learned to use my machine to do it, plus a couple of tips and tricks to make it easier.
Ready?
Here goes.
First off, fabric selection is key. You don't want to use a quilting cotton or the like. You need something with some stretch to it. A knit is great, cotton/lycra blends, swimsuit type materials...you get the point. You need to be able to stretch your material as you go along, and do it fairly easily. I used a jersey knit most recently, and that had a nice amount of stretch.
Next, you need to know which direction your fabric stretches the best. When you cut fabric for a garment, and you want to add a lettuce edge, you'll need to pay attention to the stretch in the fabric. Usually, you can tell this just by looking at a knit. This is a rib knit.
See the ribs on it? These are more pronounced than other types of knit - I picked it to show you there's a direction to the ribs. If you look closely at any knit, you'll be able to see ribs.
If you stretch in the direction the ribs are going, it isn't going to stretch very much. But if you stretch perpendicular to the ribs, you'll get an ideal amount of stretch. Even diagonally pulling the fabric will yield some stretch. I like to run my lettuce edge along the perpendicular edge of the fabric. Look at all this stretch!
To do the lettuce edge, look at your sewing machine. You want to use a simple zigzag stitch.
I set my stitch length fairly short. Almost not moving.
And I like to keep my zigzag width fairly narrow - still zigzagging, but just barely, and not straight. The zigzag is useful when working with knits, since when the fabric stretches, the stitch has more stretch.
You also want to make sure you have the right needle for your fabric. Working with knits can be tricky - make sure you use an interlock, ballpoint, or jersey type needle, whichever matches your fabric. Trust me, you will hate working with knits if you are lazy about changing the needle. It makes it work so much better when you do it right. This is what I use:
Now, you want to place your fabric under the presser foot. Move your needle using the wheel (if you have one), to test how far back and forth your zigzag goes. You want it to overlap the edge a little bit and still go a little ways into the fabric on the other side.
 |
| You can see how far I go into the fabric here. |
 |
| This shows the overlap of the edge. |
Now, with the needle in the fabric, stretch the fabric on both sides of the needle as far as it will go.
Go ahead and start sewing, making sure you are overlapping the edge with your zigzag stitches. Keep the fabric stretched as you go along. If you need to stop for any reason, just make sure the needle is in the fabric, so you can stretch it back when you start up again. Both of your hands are helping guide the fabric along as you sew - just don't pull the fabric faster than your presser feet move your fabric, or you'll have skipped stitches, and you'll have to backtrack to fix those.
Work the length of the edge, and backstitch (reverse) on the last couple of stitches to lock them in place. Here's the sample I worked up - I didn't realize until I was done that I had used a green fabric for a lettuce edge tutorial - ha!
See? It actually wasn't so hard! The hardest part is keeping it stretched as you work. And that's not so bad.
And you don't need a serger to do it. Isn't it awesome? My life with knits is so much easier for learning it now.
Here's the edge of a project I've been working on:
Hop over to the Ballet Skirt to see how it turned out!
I hope you got something out of this tutorial - see you soon!


Hey it's Cheri from Its So Very Cheri--stopping by from the Linky Party Hop.
ReplyDeleteI hope you have a fabulous week.
So pretty--I can imagine all kinds of projects.
Don't forget in addition to the Wed party HOP I also have a Sunday party and I feature several bloggers on Saturdays. http://itssoverycheri.com/2012/04/01/its-party-time-4-1-2012/
Cheri
Love it! Thanks for the tutorial, I'll definitely be giving it a go!
ReplyDeleteThanks for this! I don't have a serger either and I feel like I'm missing out on being able to do certain projects. I need to try this!
ReplyDeleteThanks for sharing this. It looks so cute when it's done. Little Bit
ReplyDeleteThanks for all the comments guys! I love it when I hit on something people find useful - you never can tell what it's going to be. As always, thanks for visiting, and feel free to ask any questions!
ReplyDeleteJess
Thanks for showing us how to do this. Nice tute. Linda
ReplyDeleteAlso, following on Linky. Linda
ReplyDeleteGreat tutorial! I would love for you to share this with my Unveil Your Genius Link Party (new linky every Thursday).
ReplyDeletehttp://taylornorris.blogspot.com/2012/04/unveil-your-genius-link-party-5.html
Happy Thursday!
Thanks for the tutorial-I'm going to give this a try.
ReplyDeleteThanks for the tutorial! I'm so curious about what you're doing with the gray...
ReplyDeleteBambina - hop over to the Ballet Skirt to see! http://tupelocreative.blogspot.com/2012/04/ballet-skirt.html
Delete