It has been requested that I do a follow up post with a tutorial and photos for the Duct Tape Easter Basket - and since I have 2 kids who need Easter baskets this week, it wasn't too much of a hardship :)
They're school Easter egg hunt is this week, and it's a great chance to show off our new, creative baskets. It's always worth sharing cheap, simple projects that kids can make themselves, with a bit of supervision.
I did things slightly differently this time - instead of using a closed container, this time I used an open cheap-o basket from Target - I'm sure the dollar store has similar offerings. I wanted a wider shape, and the open edge gave me a couple of new options.
Here goes:
Materials -
A form - I used a plastic bucket (anything for a form, just use a shape you like, as long as it's always the same width or narrower than the top part.
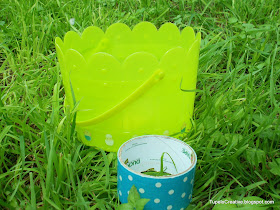
- This is the $1 plastic bucket I used for my form. It would be easier to use something with a flat/level top edge (instead of the scallops), and make sure you remove the handle first. I decided not to, but it was a little lumpier for it.
Decorative duct tape - I used just under one roll
Fabric - a coordinating fat quarter (see my previous post, Duct Tape Easter Basket for details, if you don't know what that is), or other similar sized fabric scraps you have on hand.
For this bucket, here's how I did it - if you have a closed container refer to the original post (Duct Tape Easter Basket) to see how I did it, but there's fewer pictures there.
Procedure -
First, I laid the fabric down, right side up. Then I set the bucket on top of it, and wrapped the fabric over it.
Make sure your fabric covers all the edges of your bucket. Fold over any excess fabric to the outside (away from the bucket), since you'll be taping over it. At first I taped small edges around to hold it, and then I taped two larger pieces to attach the fabric to the bucket temporarily.
At this point you can trim off the excess fabric, just be careful not too cut it too short so that you have gaps.
Then tape around the top edge. You don't want to overlap into the inside of the bucket, just tape the top edge. Repeat this down the container, overlapping each tape stripe by 1/4 or 1/3 the width of the one before it. I lined up all my edges of tape to one side of the bucket.
When you get to the bottom of the basket, tape around the bottom ring on the side, and overlap about half the tape onto the bottom of the basket.
Then you can run a layer of tape across the bottom. I used an asterisk pattern last time, but you can sort of basket weave it like I did on this one too...One vertical, one horizontal, working your way from one "corner" of the bottom to the other.
Then run another line of tape overlapping the side from the bottom. You can reinforce the bottom as much as you wish. This is how mine looked after I taped the sides and bottom. It's a little lumpy from that silly handle I left on.
Now remove all those little bits of tape entirely. Those are trash now, unless they're too involved in the taping you already did. Then just fold them over.
Now untape the larger pieces of tape, and make sure there is no tape holding the fabric in place now. You can begin to wiggle the fabric off the bucket now, just work slowly and it shouldn't be too tough, if you didn't wrap your tape too tightly around it. This is mine without the bucket in it.
Now you want to do a strip of tape around the upper edge, just like you did on the bottom. Half the tape on the outside, fold over the edge, and make a straight line on the inside, all the way around.
I forgot to take pics of the handle, sorry! I made the handle with a long strip of duct tape folded over, with no sticky part visible. Then I used an equal length piece of tape and folded over each edge, so that the seams met in the long edge center of the strap. You can set it on the outside and run another strip around the edge to hold it in place. Reinforce as much as you need to. You can sort of see how the handle was done in this photo.
Press down all the duct tape all around. If you don't you'll get weird shadowy layers, like you see in these pics. Sorry it looks a bit lumpy - it was a shadowy day and it showed a lot worse in the pics than it does in person.
Here's a late night lighting picture to make up for it. See? It's not really that lumpy after all. :) I hope this helps!


Nice!! This looks so awesome!! That's for doing the follow-up picture tutorial. I'm pinning this!
ReplyDeleteGlad you found it - thanks for stopping by!
DeleteWe linked to your post here: http://ductapegirls.com/all-your-eggs-in-one-duct-tape-basket/
ReplyDelete