
We made this fort for little C for his last birthday, and it has really held up! The boys both love it, especially at night when we have the lights on. It took us maybe 2 hours to do, just because we get distracted easily. It's mostly just pipe cutting and assembly.
 |
 |
Here's your shopping list:
Plastic garden fencing (we found ours in a 2' width at Lowe's, I think we bought 3 rolls)
Zip ties (to tie the fencing on)
Queen size fitted sheet
Twinkly lights
extension cord
propane torch or similar heat source
PVC pipes, 1" diameter (we used about 45' of it, it comes in 10' sections i think, but get extra, since you are making odd length cuts)
45 degree PVC joints, 1" diameter - 8
T shape PVC joints, 1" diameter - 4
4 way "plus" joints, 1" diameter - 4
Pipe cutters (for PVC)
 |
| Here it is naked, with no roof |
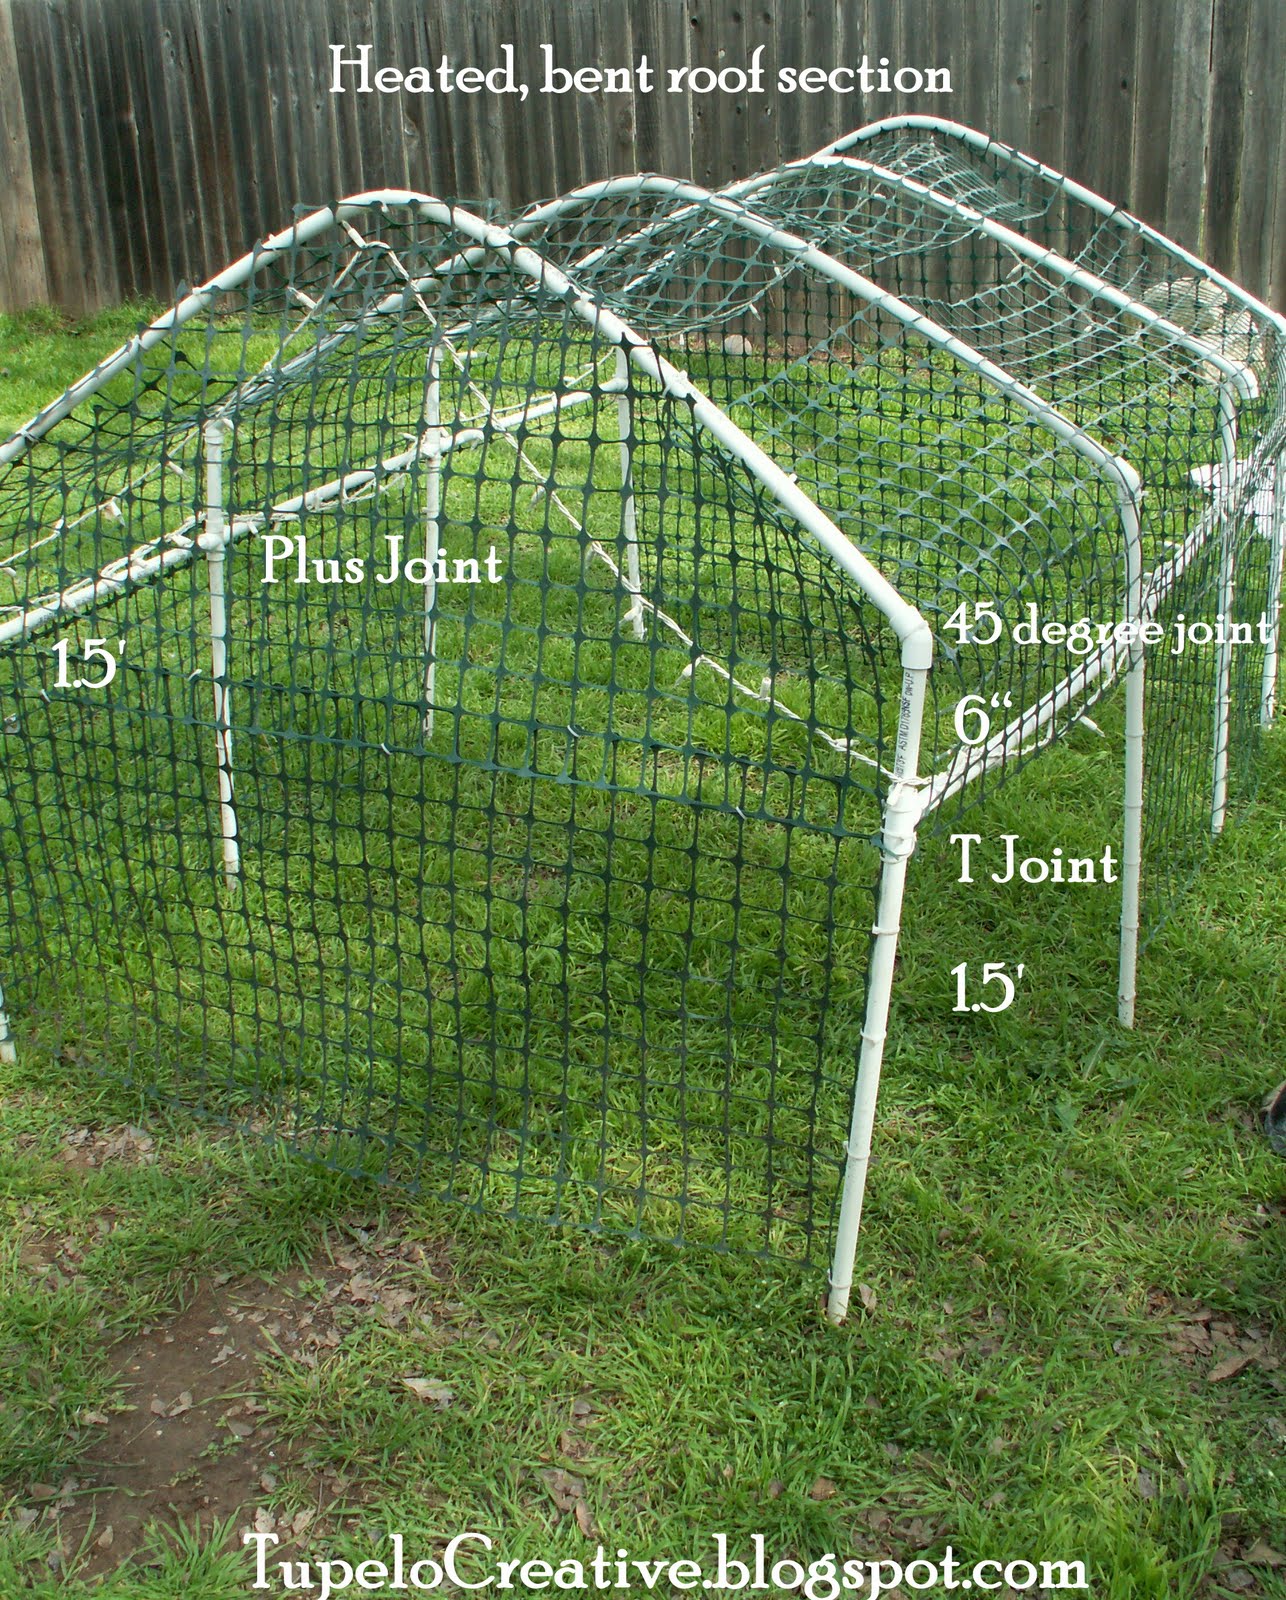
Cut Your PVC piping
The legs are 1.5' (8)
The roof is made with 5' sections of pipe (4)
Assemble Like This:

- 1.5' connects to side of T
- 6" connects to other side of T
The 4 central legs:
- 1.5' connects to plus
- 6" connects to opposite side of plus
Connect the sides:
- Corner leg + 1.5' perpendicular to the leg
- connect to on side of central leg plus
- connect central post to next central post with 1.5'
- Connect central leg to corner with 1.5'
- Repeat for other side
- Add 45 degree joints to the end of each 6" pipe section
Make the roof trusses:
- Then we took long sections of pipe (4) and heated the center point of each one with the propane torch until we could bend it to the angle we wanted.
- Be careful not to overheat the pipe, or it will break or squish too flat in the middle, and weaken it. It's not like anyone will be climbing on top...ha...I hope not...but you want it to hold up.
Connect the roof:
- Attach the angled roof sections to the legs with 45 degree joints
- Start with each end of the fort first, then do the central ones, connecting straight across
Add the lights:
- Once you have it all connected, you can go ahead and wrap the lights around the side beams and/or the legs and trusses (roof sections).
- If you wait till the fencing is up, it's harder to wrap the lights, but still possible.
- Don't forget to get your extension cord where you want it. We used a long enough one to put the fort anywhere in our yard.
Add the fencing:
- To cover the fort, attach the garden fencing to one side with zip ties, and wrap around until you get to where you want a door.
- Attach the fencing with zip ties to that post, and cut the fencing. Restart on the next post, to leave the door gap.
- If you want two doors, repeat that process.
- Another door option is to cut doors in the garden fencing on each end, but be careful to file the sharper plastic edges of fencing down. You can make a taller door this way
- Do the roof in layers with the garden fencing, zip tying to the "trusses" of the roof.
Add the covering:
- In the winter, we cover our fort with a queen size fitted sheet, to block the sun and give them some shade. They like being able to hide in it.
- In the spring and summer, we put window boxes around the sides, and plant vining plants that climb the fencing for a secret garden approach. Last year we did yard-long runner beans, and man, those things took off. We did sweet potato vines and peas as well. Anything would work, just make sure it isn't toxic, since your kids will be in there ALL the time.
 |
| This is before the beans really went nuts. |
At night we send the boys out to play when it isn't cold and rainy, for a few minutes before bedtime. It looks amazing. They like to watch the bugs that are attracted to the lights.


PS - Sure, you could use a 45 degree joint and 2.5' sections for the roof, but then you wouldn't get to use the torch. :)
Oh wow! This is VERY cool!!! I'll have to pin this one!
ReplyDeleteThanks for sharing :)