I keep seeing the mason jar pincushions/sewing kits popping up over on Pinterest (you can follow me here). I always think the idea is cute, but didn't get around to trying it until last week. I was on a tight deadline, and in a hurry to finish, and I couldn't get it to work for me. I was using Make it - Love it's tutorial, and I loved how she did hers, especially the filling them with candy. Aren't they adorable?
| Source |
So I didn't finish the project when I wanted to, and I was so mad. You see, the woman who I am planning a gift set for just lost her husband, and his memorial service was last week. I wanted to give it to her then, or close to then, since I know she sews regularly. When it didn't work, I was heartbroken. I let the idea sit in my head until I could come up with a solution, but then something popped up on my blog feed - Crazy Wonderful's tutorial for a mason jar pincushion.
 |
| Source |
On my dining table, which I have never used for projects, I set out all my stuff and went to work. I couldn't find thick cardboard without going to the garage (which I'm afraid will eat me - mostly the laundry monster), so I found some paperboard in our recycling bin from some granola bars. I used my craft knife to cut circles, used my fancy scissors to cut fabric (soooo much easier than my old scissors to get a clean edge!), and got my glue gun ready.
I got the top put together, and held my breath as I put the ring on the lid and twisted it onto the jar. It worked!!!
I literally breathed a sigh of relief and did a happy dance (after I set down the glue gun, of course). I was surprised it worked, and so happy. This was my tester, which conveniently holds 3 matching pattern weights.
See how pretty and clean the underside of the lid is? It even screws on without a fuss!
Now I just have to finish some hand sewing (which really bugs me) on a the other part of the project, and the gift will be ready.
A couple of things to watch out for if you make it yourself:
Make sure the fluff stays tucked under, inside the fabric, and doesn't overlap to the underside of the the cardboard. This makes it tough to close and tough to glue down to the mason jar so it still looks pretty. And don't put too much fluff under, else it still might be too much for the threads to get together.
I may have made 5 of these last night...
In other news:
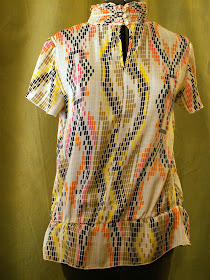
I"m working on a shirt refashion to share soon. I may have gotten carried away with the seam ripper, and it'll take me a couple days finish the extra work I made for myself now. Remember this shirt?
I decided to modify it, and went to remove the sleeves. I'm not actually sure how it happened, but instead of removing the sleeves, I accidentally removed the ruffle on the bottom. I like how it looks, so when I get the fit right, I'll share! Want a (badly lit) hint?
Pretty sure I'll just hem the sleeves, remove that weird collar (it's tucked in here), take in the sides a bit, and finish that ruffle off. What do you think? What would you do?
PS - see my new dress form? One of my favorite Craigslist items of late. There's a story there, I'll share it soon!


No comments:
Post a Comment
Let me know if you have any questions, comments, or ideas to share.